This tutorial was created to help people with the disassembly of the Rio Cali MP3 player and identification of some internal components. I am not an employee of Rio, Mouser, ALPS or any other company mentioned in this article. I own the Cali, Chiba and Nitrus MP3 players made by Rio and have posted this information so others can learn from my experiences.
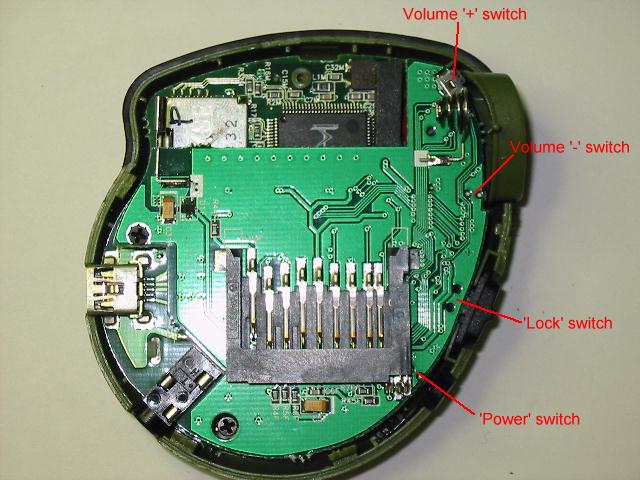
A couple of months ago my daughter complained to me that her Cali didn't work right. The problem was that the volume '+' button wasn't working. Figuring that she had dropped it on that corner I knew that I could probably fix it myself. I took it from her and promised that I would look at it "soon". I kinda let it slide for a few weeks, mostly as a subtle lesson in teaching her some patience :). When I first attempted to get a lead on who the supplier was for the broken switch, I went directly to Rio. Rio headquarters is in Santa Clara, CA, which is close to where I work. I walked in off the street and asked the receptionist if there was anyone I could talk to in the technical support department. She looked quite surprised but called someone out to the lobby to see me. I told him my problem and asked him if he could give me any information on who the supplier was for the switch. He said that he might be able to get it for me but couldn't guarantee anything. I had assumed as much, but thanked him for his time. During the next few days I spent some time using Yahoo and Google to search the net for any manufacturers of surface mount or "SMD" switches. I finally nailed it down to about 6 different companies that were in that business. I separated the case and found that the broken switch was easily accessible. I saw that the metal frame that holds the button was loose. A piece of plastic at the back corner of the switch had broken and there would be no way I could simply glue it back together. I did find that I could trim a small piece of plastic away from the case near the negative battery connection and then I could access the switch while the battery cover was off. See Figure 1 below and look closely below the "coil" that is the battery connection and you will see a small, white piece. That's the '+' volume switch. With the metal frame holding the switch's button removed I can simply push "down" on the switch and it still worked. Anyway, I measured the switch using a dial caliper and through searching each of the 6 manufacturers web sites I determined that ALPS was most likely one. I contacted ALPS and asked for a free sample. (Some companies will provide samples to possible sales leads, and I work for a company that's in the semiconductor industry). The sales agent politely declined. I then asked if they could sell me one (1) switch. I was told that their store policy is a minimum $50 order and that they could sell me 40 switches! Needless to say I said that I would try to find them on my own. A few minutes spent with Yahoo searches yielded a link to the Mouser site. As of now (9/2004), Mouser does not have any minimum order price.
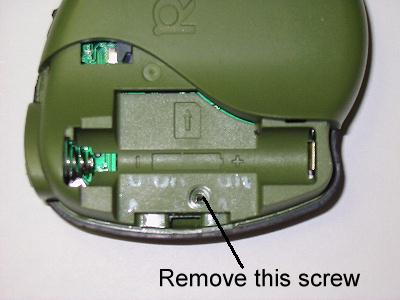
Remove the battery cover, battery and any SD/MMC memory card. There should be a small label with the unit's serial number near the edge of the battery cover. Remove the label and underneath you will find a small Phillips screw. Remove the screw.
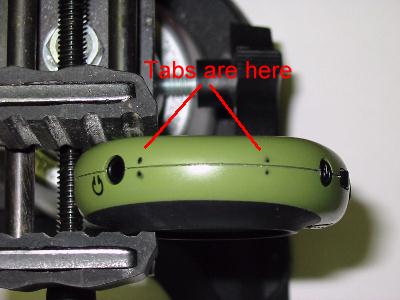
The second step is to carefully pry apart the shell of the Cali. There are several 'tabs' around the Cali's case which keep the two halves together. I have marked the outside of mine with dots so you can see where they are:
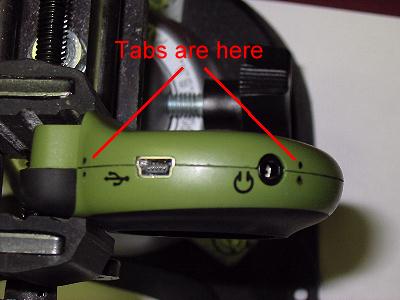

Starting from the battery compartment area, you can put a small flat-bladed screwdriver into the rectangular slot just below the screw in Figure 1 and pry the pieces apart just far enough to put a fingernail or small screwdriver between the two halves. Work AWAY from the volume switch (i.e towards the USB port), until you get to the first tab as seen on the left side of Figure 5.

When you get to the areas where the tabs are, a little more extra effort is needed to release the tabs. The first time I did it, I thought I broke the plastic tab. It should come apart without breaking; just be sure that you DO NOT try to push the tab inward. Once you get the tab near the USB port apart, keep an eye on the battery '+' contact inside the battery compartment. Insure that it works itself free as you go around prying the case apart. Continue to work around the case past the headphone jack, power switch, lock switch and the volume control switches. Once you have the case apart, you should see this:
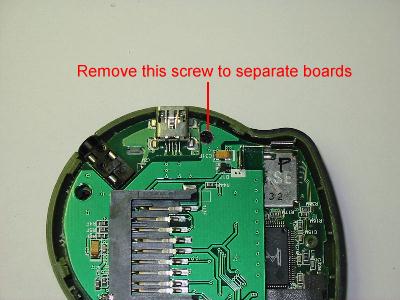
If you are having a problem with the volume '+' switch, like I did, you can easily get to it at this point. Simply remove the plastic volume control rocker by lifting up (there's two small pins on either side of it that enables it to pivot. If on the other hand, you are having problems with volume '-', 'lock' or 'power' switches then you are going to need to separate the two printed circuit boards. Refer to Figure 7, below. Remove the small Phillips screw where indicated. You do not have to remove the 'lock' or 'power' buttons on the opposite side of the case from where the screw is.
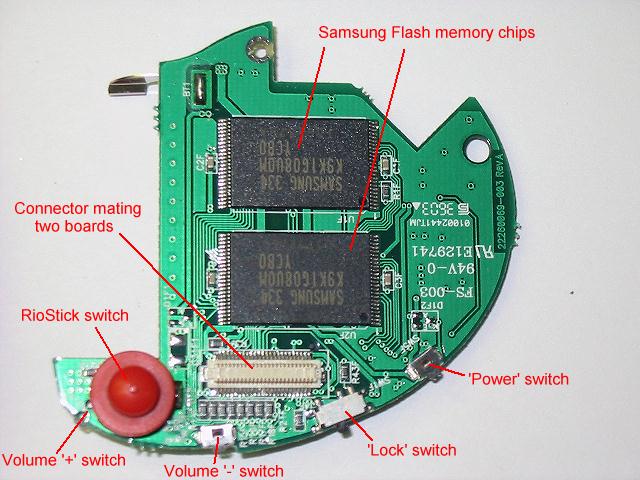
Once you remove the screw, carefully pull the board straight up and you will have this:
Through relentless pursuit via web searches, and with absolutely no help from Rio, I believe that I have found the manufacturer and a source of ordering replacement volume control and lock switches:
| Rio Part: | Volume and Power switches |
| Manufacturer: | ALPS |
| Mfg. Part #: | SKRELBE010 (this is a link to an ALPS .PDF file) |
| Description: | SMD Tactile Switch 3.9 x 3.55 x 1.5mm 220gf with guide bosses (see Note below) |
| Source: | Mouser.com |
| Source Part: | 688-SKRELB (this is a link to a Mouser order page) |
| Note: | Some time prior to Sept 2004, this part was discontinued by ALPS and is superceded by SKRELGE010, a lead-free version (Mouser part 688-SKRELG). "220gf" refers to the amount of pressure required to activate the switch. "gf" means "gram force". ALPS also uses a spec of 2.16N (Newtons) which is an identical pressure. The "guide bosses" refers to the two plastic guide pins on the bottom side of the switch which aids alignment of the switch and provides some (limited amount) of protection from the switch being sheared off through excessive activation pressure. I used the SKRELB switch only because Mouser was out of stock of the newer version. |
| Rio Part: | Lock switch |
| Manufacturer: | ALPS |
| Mfg. Part #: | SSSS811101 (this is a link to an ALPS .PDF file) |
| Description: | SMD Slide Switch SPDT (1 pole, 2 positions) 1.5mm travel, with ground terminals |
| Source: | Mouser.com |
| Source Part: | 688-SSSS811101 (this is a link to a Mouser order page) |
| Rio Part: | RioStick (5-way joystick) |
| Manufacturer: | ALPS |
| Mfg. Part #: | SKRHABE010 (this is a link to an ALPS .PDF file) |
| Description: | 4-directional switch with center push, with guide bosses |
| Source: | Mouser.com |
| Source Part: | 688-SKRHAB (this is a link to a Mouser order page) |
If you have separated the two PC boards, then you should follow this procedure when putting everything back together: